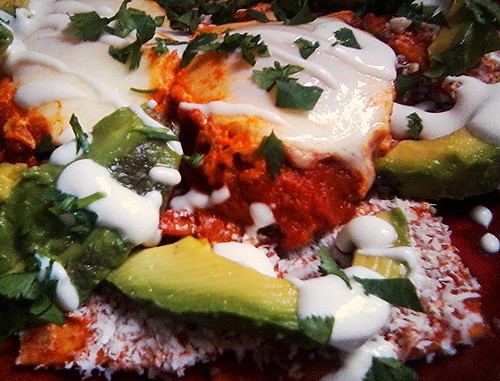
Chilaquiles!, originally uploaded by michele wynne.
Welcome to my current little kitchen obsession. Here's what's going on here~fried tortilla chips bathed in chile sauce and then dusted with finely grated cotija cheese. Sounds pretty good right? Well, hold onto your hats because that's only the beginning of this crazy good brunch I made for myself yesterday and the day before and the day before that! These ridiculously good wet nachos are then layered with sliced avocado, fresh cilantro, couple of eggs poached in chile sauce and then finished with a drizzle of crema. These things are addictive!
Inspiration came by way of a birthday lunch (thanks Sheena!), many months ago to Nopalito where they serve an appetizer version called Totopos Con Chile.
Traditionally, Chilaquiles are prepared for brunch as a way to use up stale tortillas, leftover salsa and cheese.
Inspiration came by way of a birthday lunch (thanks Sheena!), many months ago to Nopalito where they serve an appetizer version called Totopos Con Chile.
Traditionally, Chilaquiles are prepared for brunch as a way to use up stale tortillas, leftover salsa and cheese.
I was intrigued, in fact more than a little surprised that I'd never before encountered these given that I've been devouring Mexican cuisine since I made my first taco in Home Ec.
Anyhoo, after an intense Google-thon, here's how this all went down:
Red Chile Sauce
adapted from Bon Appetit
7 dried Guajillo chiles
28 ounce can crushed tomatoes
1 medium onion
5 cloves garlic
1 jalepeno
1/8 teaspoon smoked paprika
2 tablespoons vegetable oil
2 teaspoons agave nectar
2 teaspoons Sriracha
salt to taste
Chips
6 to 8 corn tortillas, cut into 4 wedges each-leave them out overnight to dry
4 tablespoons of oil
salt
grated Cotija
Crema
8 ounces sour cream
2 tablespoons fresh lemon or lime juice
salt
additional toppings:
sliced avocado
black beans
Cilantro-chopped
cooked chicken
Chips
6 to 8 corn tortillas, cut into 4 wedges each-leave them out overnight to dry
4 tablespoons of oil
salt
grated Cotija
Crema
8 ounces sour cream
2 tablespoons fresh lemon or lime juice
salt
additional toppings:
sliced avocado
black beans
Cilantro-chopped
cooked chicken
Soak the chiles in 4 cups of boiling water for about 15 minutes. While the chiles are soaking, heat 2 tablespoons of oil in a medium skillet and cook the diced onions until brown and caramelized, add the garlic, jalepeno and paprika and cook for another minute or two until the jalepeno softens. Remove from the heat. Back to your chiles, reserving the soaking liquid, remove the stem and cut the chile open, remove the seeds and lay the chiles out on a cutting board and chop them all up. Pour the cooking liquid through a strainer to remove the seeds.
In a blender, pour in the can of tomatoes, add the onion mixture and the chili pepper. Wipe the skillet with a paper towel. Place the lid on the blender with the central part of the lid removed. Stand by with the liquid and once the blend gets moving, slowly pour the liquid into the blender, just until the funnel forms and the sauce is blending nicely.
Lay out a baking sheet or large plate lined with paper towels. In the skillet, add 4 tablespoons oil and heat to medium high. When the oil is hot, place the tortilla wedges in a single layer and cook until golden brown turning them over with tongs, frying in batches until you're done, drain the chips on th paper towel and sprinkle with salt.
The next part of this goes a little fast. For the Totopo version I prep the grated cheese on a plate or a wide shallow dish and have it at the ready for when the chips come out of the sauce.
Drain off most of the oil and let the skillet cool down a little.
If making these for brunch, I'll have another smaller pan (with a fitted lid) ready so I can poach some eggs in the sauce as well. Crack eggs into ramekins.
Pour the pureed sauce into the skillet and bring to a simmer. Stir in the agave and the Sriracha. Taste. Add salt, a pinch or two at a time, to bring out the flavor of the tomatoes and peppers. Add more agave and/or Sriracha if you want. Pour some sauce into the second pan and poach the eggs
Return the chips into the skillet and carefully stir to coat them with sauce. Cook for about a minute or so. If you're serving these as an appetizer you'll want to keep them crisp. With tongs, remove the chips, shaking off excess sauce and then dipping the chip onto the plate of cheese to coat. If you're going the brunch-poached egg route then a little additional cooking time is fine to make them fork friendly. With a slotted spoon, scoop up the chips and place them directly onto your serving platter or individual plates and sprinkle cheese on top and then layer any additional toppings like avocado, black beans or cooked chicken. Lay the poached eggs on top and then drizzle crema on top and sprinkle with additional cheese and chopped cilantro and be ready to dive into the crazygoodness of Chilaquiles.