I went to a party last week. I rarely go to shindigs that require dress-up so I was quite distressed to discover that my favorite dress pants were alarmingly snug, you know that unfortunate midriff tightening that turns your pants pockets into gaping mouths, giving the appearance of 18th century panniers (think Marie Antoinette). After my initial horror, I was forced to switch tactics, I yanked off the sparkly t-shirt and replaced it with a dress, that oh-so-chic, 70's revival style of dress and pants at the same time. I immediately followed that with a very firm commitment to amp up the veggies in my day-to-day kitchen/break-room strategy. Then I went to the party and ate stacks of herbed chicken on focaccia sandwiches, food truck gourmet pizza, and kettle chips (love 'em), rounding it all out with many glasses of white wine and salted lavender cookies.
The very next day...
The very next day...
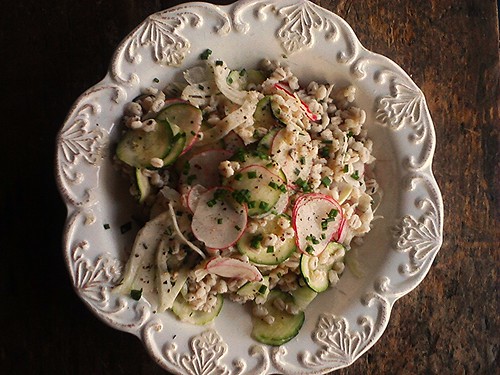
I was bitten with the grain bug when I first made this California Barley Bowl a couple of weeks ago. The addition of a plump nutty grain to any combination of greens and/or vegetables, then tossed with a tangy dressing is an amazingly filling and satisfying meal in a bowl. Toasted nuts, seeds, dried fruit, crumbly cheese, shaved cheese and avocado can be tossed in for more complexity, but that's not necessary in this salad. I had to rein in the urge to prematurely tweak, so I didn't crumble the remnants of my Pt. Reyes Original Blue Cheese over this or fan out some thinly sliced avocado to top things off.
Nope. I stuck to my guns, and followed the recipe as directed because I trust that Heidi knows when enough is enough. Besides, I've got a freezer full of grains to play around with now and as it turned out, this was exactly all that it needed to be.
Nope. I stuck to my guns, and followed the recipe as directed because I trust that Heidi knows when enough is enough. Besides, I've got a freezer full of grains to play around with now and as it turned out, this was exactly all that it needed to be.
Two things that make me very happy in a salad are shaved vegetables and buttermilk. I love the word "buttermilk". There's just something warm and fuzzy about it that brings to mind a kindly, apron-clad grandmother in a cotton print dress, baking biscuits in a big country farm kitchen.
Anyhoo, it is time, once again, for the millionth time, to revive the veggie challenge. Except it's not really a challenge anymore. I just need to focus and ignore those diversions that lead me to places like this and this and this.
I also want to share two of my favorite cooking tips:
The first, is strategy for fool-proof cooking of your chosen grain. This is the boil and steam method I got from Jamie Oliver's Food Revolution. It takes some attention, but it you don't have a rice cooker, it turns out a grain to exactly your preference.
The second tip, from 101 Cookbooks (of course), is to cook up a big batches of various grains and freeze in 2 cup portions. I do this with beans too. I use the smaller freezer bags and then insert the filled bags in larger freezer bags.
TO PREPARE THE GRAIN:
- start with a large pot that either has a steaming insert or will fit a colander inside
- rinse the grain well in a mesh strainer with lots of cold water
- put on a kettle of water to boil
- fill the pot with cold water to about the halfway point or at least twice the volume of grain and bring to a boil
- add a generous amount of salt and/or bouillion seasoning (if desired)
- add your rinsed grain
- boil your chosen grain just until it's chewy
- drain the grain in a colander
- cover with aluminum foil pressed down onto the surface of the grain
- pour some of the boiling kettle water into the pot-about an inch in depth- make sure the water is not going to touch the bottom of the colander
- Turn up the heat to high for a minute or so, until it boils, then lower to a simmer and set the colander into the pot and cover with a lid.
- Steam for 10 minutes, fluff with a fork and taste. Repeat until it reaches your desired texture of chewiness-just don't let it get soft.
TO FREEZE:
The idea behind this method, rather than rinsing with cold water to quick cool the grain, is not to introduce more water, which will crystalize in the freezer.
- place a baking sheet in the freezer (or 2 if you have the space) about the same time you've transferred the colander into the pot to steam.
- when the grain is ready, remove the colander from the pot and set it on the counter to cool, giving it a toss every now and again to let off steam.
- remove the baking sheet from the freezer and transfer the grain, spreading it over the entire surface of the baking sheet.
- let the grain sit for a few more minutes until it stops steaming.
- place the baking sheet in the freezer for 10 minutes.
- remove the baking sheet from the freezer and transfer the grain into freezer bags and/or storage containers, depending on the amount you plan to use within the next two days.
- Remove the bag of grain from the freezer, open the bag and let it thaw at room temperature for about 15 minutes.
- Over a mesh strainer, break apart the still frozen pieces to get them out of the bag and tumble the grain into the strainer.
- Rinse with cold water to break apart the grain, then shake away the excess water (the remaining water will be enough to steam and moisten the grain)
- Place the grain into a glass bowl and microwave for a minute, remove, stir, taste, then microwave again for a minute, just until the chill is off.
No comments:
Post a Comment